Tissue culture in the Home Kitchen
it's not as hard as you might think!
A slide show by Rick Walker
Why bother with Tissue Culture (TC)?
- faster propagation (perhaps 10x) - reduces demand for wild
collected plants.
- no worry about fungus, pests, etc.
- long term maintainance of plants (stick 'em in the fridge!)
- IDENTICAL clones of horticultural varieties easily generated
(actually, the last point is not quite true. Scott Hyndman,
marva@nebula.ispace.com, informs me that Clonal integrity is influenced
by stress factors, genotype, culture age, cutting and transfering
technique, and numerous other factors still being investigated in the
voluminous scientific literature on just this fascinating aspect of
plant tissue culture alone.)
Some useful definitions
-
-
 Totipotency:
certain cells have the capacity, when isolated and properly
grown, to regenerate a whole plant. This is nothing strange or
unusual. The picture shown here shows how the common "spider plant"
is capable of starting new growth at the end of each shoot.
Totipotency:
certain cells have the capacity, when isolated and properly
grown, to regenerate a whole plant. This is nothing strange or
unusual. The picture shown here shows how the common "spider plant"
is capable of starting new growth at the end of each shoot.
-
-
 Meristem:
The region in a growing plant where the cells are rapidly dividing.
The picture shows how the meristem can be isolated from a
strawberry shoot to be grown out in sterile tissue culture.
Meristem:
The region in a growing plant where the cells are rapidly dividing.
The picture shows how the meristem can be isolated from a
strawberry shoot to be grown out in sterile tissue culture.
Both these pictures are reproduced from "Plants from Test Tubes" by
Lydian Kyte. This book is highly recommended as a reference for beginners,
and a full bibliographic reference is given later in this talk.
More accurately, this should be called a talk on "in-vitro" propagation
of carnivorous plants. "In-vitro" means "in glass", or under sterile
conditions.
It is very difficult (or sometimes nearly impossible as in
Nepenthes) to properly sterilize meristem tissue from many CP.
Some of them have symbiotic fungii living within their cells. This
stuff usually breaks out and overruns the culture when meristemming is
attempted from non-sterile material.
For this reason, the most reliable way to start a CP cell line
is from seeds.
Once you have a sterile culture going, then you can multiply the
tissue with hormones, and re-divide ad-nauseum.
For some CP, notably Pinguicula and Sarracenia, it is
possible to do meristem techniques with normally grown plant
material. I won't cover the dissecting procedure here, but the sterile
technique, media preparation, etc., are identical to the in-vitro procedures
shown here.
More useful definitions
- Auxin
- hormone that primarily controls cell elongation
inhibits side shoots, produced at apical meristem
- Cytokinin
- hormone that primarily stimulates cell division. Examples
are 6-(y,y,dimethylally-amino)-purine (2iP), Kinetin (K), and
6-benzylaminopurine (BAP)
Toby Marsden defines the three classical stages of hormone-assisted TC as:
- Stage I. establishment/germination (no hormone)
- Stage II. multiplication (low auxin, high cytokinin)
- Stage III. rooting (high auxin, low cytokinin)
For home tissue culture, hormones are not necessary. Most plantlets such
as Pinguicula already grow much faster in TC than in soil. Unless
you need extremely fast multiplication for commercial purposes, or are
experimenting with meristem propagation of very difficult species (eg:
Nepenthes ), it is unlikely that you will need to use
hormones or cytokinins. Many of these chemicals are dangerous
(mutagenic or carcinogenic), and are not really appropriate to be using
in the kitchen.
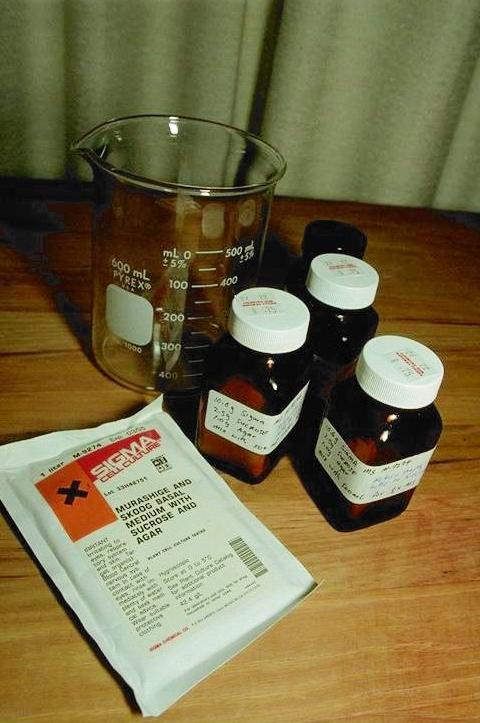
 Commercial TC media
This photo shows a package of Murashige and Skoog (MS) Tissue Culture media
as sold by SIGMA chemical company. Each packet provides enough chemicals to
prepare 1L of media. To use this media for CP, it generally
needs to be diluted in strength. I usually use 1/2 strength for most
non-critical plants. The four bottles shown each contain 1/4 of the
SIGMA packet,
built back up to proper sucrose and agar concentration.
For most CP, 20-30g/L sucrose and 6g/L agar is appropriate.
 A scale, sugar and agar.
Each bottle then conveniently contains the proper chemicals for a 500mL
batch of media.
The next slide covers the functions of the major nutrients in
TC media.
Components of TC growth medium
- The Organics: C, H, O
- AGAR - neutral substrate
- sucrose - (C12-H22-O11) provides energy source for cells
- inositol - (C6-H12-O6) simple alcohol sugar
- hormones - control growth
- fungicides - control contaminants
- antibiotics - control contaminants
- antioxidants
- Inorganic Macro nutrients
- N ... leaf growth, chlorophyll, amino acids, proteins, cell membranes
- P ... meristem growth, fatty cell membranes, DNA production
- K ... cell division, root formation
- S ... root development
- Ca ... pectin (cell wall glue) vital to meristem growth
- Mg ... integral to chlorophyll molecules
- Fe ... vital to pigment and chlorophyll formation
- Inorganic Micro nutrients
- B ... Sugar movement within plant
- Mo ... Nitrogen Fixation
- Mn ... subtle (controls vital enzyme pathways)
- Cu ... subtle (controls vital enzyme pathways)
- Zn ... subtle (controls vital enzyme pathways)
- Cl Al Na Si Co (secondary: need for these varies by species)
Using baby-food jars for a growing chamber
 punching an air hole in the lid
 using foil as a contaminant barrier
Baby-food jars make excellent and inexpensive growing chambers. For the
beginner, a hole may be made in the lid with a nail and hammer. To prevent
contamination, the lid is kept wrapped with aluminum foil. This allows
slight breathing of the media while providing a baffle to exclude bacteria
and spores.
The more advanced TC enthusiast may wish to purchase plastic caps from
a commercial source such as SIGMA chemical company. I use the
"MAGENTA B-cap". They are sterilizable, provide baffles, and are transparent
to light. This makes it easy to grow the cultures with overhead
illumination. These caps are designed to be used with standard baby-food
jars.
A Simple Home Recipe:
Tissue culture does not need to be a "high-tech" affair. Many
non-fussy plants can be easily grown on a cookbook "kitchen-style"
media. Here is a simple one, adapted from Kyte, to try for
Pinguicula and Drosera. There is a lot of room
for experimentation, and
this formula can certainly be improved with some trial and error.
 components of a simple homemade media
- 1/8 cup table sugar
- 1 cup water
- 1/2 cup stock solution
(Miracid diluted 1/4 tsp in 1 Gallon water)
- 1/2 inositol tablet (125mg)
- 1/4 vitamin tablet with thiamin
- 2 Tablespoons agar flakes
For variation, try substituting coconut milk in place of some
of the water. Common concentrations used in the literature are
100 to 200 ml of Coconut milk per liter of media.
Inositol is a common human food supplement and can be found at
health-food stores in gel-caps. Agar is
sometimes available at the same stores in bulk bins. Another place
to look for agar is at Oriental food specialty stores. Agar is
commonly used in Asian cooking as a gelling agent for desserts.
Get the whitest and purest, unflavored variety that you can find.
You may have to experiment with the concentration when you use
non-standardized agars. Your goal is to achieve the minimum
concentration of agar that still reliably forms a gel. This will
produce a media that offers minimal resistance to root growth.
Note: This recipe was originally designed for general purpose use. Most
CP require a more dilute nutrient concentration than non-CP, so you
might try reducing proportions of stock solution and sugar until
best results are obtained.
 Plants from Test Tubes
This recipe is adapted from the highly recommended book "Plants from
Test Tubes" by Lydian Kyte, published by Timber Press (see references
at the end of this document for ordering information).
A More Sophisticated Recipe:
This is the Pinguicula Media recommended by
Bill Carroll in the Carnivorous Plant Newsletter, v11 n4,
December, 1982 pp. 93-96. As you can see, you probably
don't want to attempt this one without an accurate balance
and a well-stocked supply of chemicals.
- CaNO3 1000 mg/liter
- NH4NO3 300 mg/liter
- KH2PO4 250 mg/liter
- MgSO4 250 mg/liter
- MnSO4 10 mg/liter
- Fe Chelate 20 mg/liter
- Thiamine 10 mg/liter
- Inositol 100 mg/liter
- Sucrose 20,000 mg/liter
- Agar 12,000 mg/liter
For shoot multiplication use Kinetin or 2iP in range
of 0.5 to 2.0 mg/liter. Auxins for rooting were IBA or
NAA in range of 0.1 to 1.0 mg/liter.
Bring media to boil while stirring constantly, dispense
into test tubes or other containers and steam sterilize
for 15 minutes at 15PSI (120C or 250F).
Some commercial sources
- SIGMA Chemical Company
- P.O. Box 14508, St. Louis, MO, 63178, (800) 325-3010
(ask for the "Plant Cell Culture Catalog"). They tend
to be a bit uptight at this company, so you may need to
get a "fee-exempt" nursery license from your local Agriculture
Department before SIGMA will do business with you.
- GIBCO/BRL Life Sciences
- (800) 828-6686
- Carolina Biological Supply
- Burlington, NC, (919) 584-0381,
1-800-334-5551, or caroscipub@aol.com
Mix and Dispense the Media into the Jars
Whatever formula you use, you need to mix it up according to the
manufacturers recommendations, or according to your formula. I usually
heat the water almost to boiling before adding the Agar with vigorous
stirring. When fully dissolved, you can dispense 1-1.5 cm of media
into each Baby-food jar. Be careful not to get any media on the
rim or sides of the jars as this will later provide a path for
contamination. Replace the (vented!) lids on the jars and
stack them into the pressure cooker for sterilizing.
Sterilizing the Jars and Media
 Loading a simple pressure cooker
Make sure and use a trivet to hold your jars up off the bottom of the
cooker. You want to steam-sterilize them, not boil them!
This small, skillet-sized pressure cooker came from the Whole Earth Store
for about $200. It's a fairly pricey, high-end stainless-steel model
for gourmet cooking. I included it here as an example of
"making-do" with what is available. This canner is just big enough to
barely fit 7 short baby food jars.
 Loading a bigger "Home Canner" pressure cooker
This is a bit more industrial sort of canner, made by "American Aluminum
Company". It's very nice for sterilizing big batches of media, tools,
and for sterilizing rinse water.
I purchased this one mail-order from Mellinger's [see refs. for
address], but the same canner is also available locally at Orchard
Supply and Ace hardware. Smaller units from the same company can be had
for around $70 or so.
Although Microwaves have been used for sterilization (see
bibliography), the results have been spotty. The dividing line
between achieving sterilization and flash-overboiling the media is
extremely fine. Even under the best circumstances, the incidence of
contamination is much higher with a microwave than with a pressure
cooker. If your environment has a high concentration of heat-resistant
spores, then microwave sterilization will probably be unusable.
With a pressure cooker you can assume, with near certainty, that your
media is absolutely sterile. Then you can focus your attention on
reducing contamination during seed sowing, cell transfer, etc. I highly
recommend using a pressure cooker for any serious TC work.
 Processing
 Processing
Whichever type of pressure cooker you choose, they all should be set
for 15 PSI/250F, and run for 15-20 minutes.
I usually leave the check valve open until it starts to discharge a good
quantity of steam. At that point, you are assured that the vessel is
well-filled with live steam. You can then close the valve, lower the
heat, and start the timer once you've come up to pressure.
Never leave a cooker unattended. Please read all the safety directions
for your cooker before starting!
Make sure and let the cooker come to room temperature before opening the
vessel. If you don't, then your media is likely to burst into a boil and
foam all over the place. I usually leave the cooker overnight before
opening it. This also has the advantage that the agar will be fully gelled,
and there will be no problem with spilling the media when removing the jars.
After things have completely cooled, you can safely open the cooker.
There may be a slight internal vacuum which could suck in
contaminated room air. It is suggested that the cooker checkvalve be
wrapped in paper toweling that has been soaked with isopropyl alcohol.
Carefully release the internal vacuum by opening the check valve. The
room air will then be filtered by the paper toweling.
Sterilizing Seeds or Tissue
- Common Isopropyl "rubbing" Alcohol - full strength
- Chlorine ("Clorox" brand bleach dilute 10:1)
- H2O2 (3% Hydrogen Peroxide from the drug store)
- Wetting agent (such as Kodak "photoflow", or liquid detergent
such as "Joy" brand)
 alcohol, bleach & peroxide
 labelled seeds on filter paper
 folding paper and securing with plastic clip
I sterilize seeds in a little folded packet of filter paper by soaking
for 5 minutes in isopropyl alcohol (frequently shaken or stirred),
2-4 minutes of 1/10 Clorox solution, and 1-2 minutes of 3% H2O2 as a
final rinse. I leave the residual peroxide on the seed as a further
infection prevention measure. Some workers prefer to rinse all traces
of chemicals off the seeds with pre-sterilized water.
It can help to add a drop of detergent to the bleach solution to allow
better wetting of the oily seed coat.
In private correspondence, Jan Schlauer has recommended judging the
bleach timing by looking at the color of the seed coat. When you
have just noticed a change in color (from black to brown, or from brown
to straw-colored), this is about the right time to stop the chlorine
disinfecting step.
 soaking seeds
It is always a delicate juggling of trying to kill the contaminants without
killing the seed. For the best chance of success, you may want to divide
your seed into several batches. Process one batch for 1 minute, the next
for 2, and the last for 4 minutes. Sow them in seperate flasks and keep
good records. This will help you to perfect your judgment and technique.
Doing the actual innoculation
 A commercial laminar-flow hood
This is another line drawing from Lydian Kyte's book: "Plants from Test
Tubes". A commercial hood like this can cost perhaps $1500.00. You can
buy the filter and fan units separately to make your own for much cheaper
if you are handy with working in plexiglass.
In a laminar-flow hood, the incoming air is filtered by a
High-Efficiency-Particulite Air Filter (HEPA) and flows smoothly
over the work area. The HEPA filter is fine enough to completely
remove mold spores and bacteria from the air stream.
John Laroche has written a simple "howto" describing a how to build a
Glove box, Laminar Flow hood and a culture rotator.
For the hobbyest, good results can be obtained with the much simpler
system illustrated below. This is an adaptation of the "glove box"
type of transfer chamber.
 Simple aquarium transfer box
This is a 40 Gallon Aquarium, turned on its side, and covered with a
curtain of plastic sheeting. I use the overhead fluorescent fixture
for lighting. The clear section of glass in front of the light
fixture is where to look for a clear view.
Prior to using the chamber, you should swab down the inside of the box
with a paper towel moistened with Isopropyl. Be very careful
to let the fumes dissipate prior to lighting your lamp! In this regard,
Isopropyl (rubbing alcohol) is much safer than, say, Lysol Spray, which
contains Ethanol (grain alcohol) and is much more flammable.
To further safeguard against contamination, you may want to buy a
home air filtering unit. The Holmes company makes a unit with a
true HEPA filter, for about $70.00.
I usually leave the unit running for a day or so prior to doing
sterile transfer work. This greatly reduces much of the air-borne
dust in the home environment.
This same chamber serves nicely as a growing area.
 cleaning hands prior to beginning work
I clean my hands with soap and water, and rub them down with isopropyl.
Plastic surgical gloves can also be worn, if desired.
A short sleeve shirt is recommended to avoid carrying particles in with
the fabric.
 tools used for transfer work
A good watch is useful for timing the sterilization steps. (Make sure
you think through your technique... I've sometimes gotten involved in
sowing seeds, and left others to soak for 20 minutes in bleach... this
is not recommended!)
Another useful tool is a pair of tweezers. These should be fairly
long so that you can manipulate the material without getting your hands
too close to the agar. An 8" piece of thin, stiff wire with tip fashioned
into a 1/8" loop is helpful for sowing seeds.
A pair of forceps and a razor blade or sharp knife for dividing
clumps of plants may also be needed.
 alcohol lamp for sterilizing tools
A camping burner or at least a candle will be needed in order to sterilize
the wire loop during the sowing procedure. I use a lab-style alcohol
lamp. This type of lamp has a broad base to prevent tipping. Be careful!
Also, note that Isopropyl alcohol does not burn well at all. You will
need to buy denatured methyl alcohol for your lamp. This fuel burns cleanly
and leaves no residue on the tools.
 sterilizing innoculating loop in flame
I usually dip my tools in isopropyl and then "flame" them off in the
alcohol lamp. This helps to sterilize both the shaft and tip of the tool.
After "flaming" off the isopropyl, I then heat the tip
of the loop until it glow red. It can then be inserted in the gel while
still hot to cool it down. This technique serves two purposes: 1) it keeps the
tip hot to protect from contaminants, and 2) it picks up a little gel
on the tip to make it "sticky". This bit of stickyness will help to
pick up the seeds in the next step.
 picking up the seeds
 sowing the seeds
Notice the MAGENTA B-CAP held in the curl of the right hand. This is a
helpful sterile lab technique that is worth practicing. Here is the
procedure:
- The left hand picks up the capped, sterilized jar with media
- The right hand dips the tool in a cylinder of isopropyl
- The little finger and fleshy part of the palm of the right hand
is used to open the plastic cap of the culture jar. The lid is NOT
set down - this might lead to contamination.
- It is best if the open jar is held at an angle away from the
technician, so that air-borne spores are less likely to be able to
settle onto the media.
- Holding both the lid and the tool, the right hand then flames
the tool to sterilize it.
- The red-hot tool is then inserted into the agar to cool it and
make it slightly sticky.
- The sticky loop is then used to pick up a few seeds from the filter
paper and to deposit them evenly across the agar surface.
- The right hand, still holding the plastic lid, now replaces it
back on the jar.
 showing seed placement
As usual, there is a trade-off to be made here. The more seeds you
sow, the better your chance of having a successful germination - BUT - also
the higher chance of contamination. For easily sterilized glossy seeds such
as Dionaea , I usually sow up to 20 seeds. For tougher seeds,
like Nepenthes , you might be better advised to only sow 3 or 4.
Transferring plantlets for further growth
 Pinguicula heterophylla in culture
 tranferring plantlets
 plants in-vitro and also planted out
I have kept my cultures under coolish home temperatures (60-75 degrees
F), 12 inches below a two-tube 40W fluorescent light fixture. I keep
the culture jars inside the same glass aquarium that I used as the sowing
chamber. This helps to reduce contamination from
air-borne dust.
After your plantlets have reached the size of a pea, you have a choice
of further multiplying them in-vitro, or transferring them out
to grow in regular soil. If you choose to multiply your plants further,
you initiate the process by simply cutting up your sterile material and
moving it into new media. At each stage, you may be able to increase
the number of flasks by over 10 fold.
Of course, all dissection work must be done under sterile conditions.
A laminar-flow hood is really handy here, as the plant material will
be exposed to possible contaminants for an extended period of time.
If you are skillfull and quick, it can still be done with minimal
equipment.
Moving the plantlets to regular soil
The key to sucessfully transferring your in-vitro plantlets into soil
is to be very fastidious about washing off all the
TC media from the roots.
I usually put the plantlet under running, tepid water, and use the force
of the water to thoroughly dissolve off all the old media. If this is
not done, then molds will inevitably take hold and overpower your plants.
After planting out, treat the plants the same as they were treated while
still in-vitro. A humidity tent made with a zip-lock bag will help the
plants acclimatize. Let them stay sealed for a week or so. You can then
gradually open up the bag over the course of another week to get the plants
used to lower humidity. Once they are "hardened off" properly, you can
treat them as any other soil-grown plant.
Summary of CP Tissue Culture Formulas and References:
Please excuse the technical format of this list. It is organized
by family and genus. Much of the info here is due to Jan Schlauer,
Andreas Wistuba, John Laroche and others on the CP listserv group.
Many thanks to these intrepid experimentors!
In cases where there is no formula listed, you might try using one
for a related genus in the same family. Other than that, you are
probably exploring new territory. Please keep good records and let
us know what you find out!
- Sarraceniaceae {DUMORT.}
- Darlingtonia {TORR.}
- Heliamphora {BENTH.}
- 2/3 Knudsen C with 0.1mg/l NAA (reported by Toby Marsden)
- Sarracenia {L.}
- 2/3 Knudsen C(*) with BAP, ABA for mult and root
- 1/6 MS, is second choice
- Byblidaceae {DOMIN}
- Byblis {SALISB.}
- Sigmas modified MS (1/2 x macro-, 1 x micro-)(M0153) + BAP, IBA
sometimes vitrification trouble with B.gigantea
- Bunn 1985. Australian Horticulture. 83(5):103
- Cephalotaceae {DUMORT.}
- Cephalotus {LABILL.}
- Sigmas modified MS (1/2 x macro-, 1 x micro-)(M0153) + BAP, IBA
- In vitro propagation of Cephalotus follicularis (Australian
Pitcher Plant). HortScience 14, 521-513
- Droseraceae {R.A.SALISB.}
- Aldrovanda {L.}
- Dionaea {SOLAND. ex ELLIS}
- Hutchinson 1984. Scienta Horticulturae 22:189-194.
- Beebe 1980. Bot. Gaz.141(4):396-400.
- Parliman et al. 1982. J.Amer.Soc.Hort.Sci. 107(2):305-310.
- Parliman et al. 1982. J.Amer.Soc.Hort.Sci. 107(2):310-316.
- GERMINATION: 1/2 strength MS Salts, full strength minimal
organics, 100mg/l Casien, 100mg/l inositol, 30000 mg/l sucrose
and 7 g/l agar Ph at 5.9 Replate medium as above but with
0.2 mg/l NAA and 5.0 mg/l 2iP. - John Laroche
- Drosera {L.}
- 2/3 Knudsen C (*)
- Janssens 1986. Med.Fac.Landbouww.Rijksuniv.Gent. 51(1):61-66.
- Anthony, J. (1992). In vitro propagation of Drosera spp.
HortScience 27, 850.
- Jeff Welch reports good results with D.petiolaris-complex using
1/4 MS basal salts plus vitamins, 20g sucrose and 6g/l agar.
- Drosophyllum {(L.) LINK}
- Nepenthaceae {DUMORT.}
- Nepenthes {L.}
- 2/3 Knudsen C(*)with 0.2-2mg/L BAP for mult. Rooting horm not neces.
- Anderson's may be used also (N. ephippiata likes it).
- Highland ?: 1/3 MS
- Lowland only: 1/2 MS, 20g/L Sucrose, 6g/L agar.
w/ 0.1-0.2 BAP multiplying
w/ 2mg/L IBA rooting
- Toby Marsden recommends addition of 0.1mg/l NAA to N. media
- Dioncophyllaceae {(ENGL. & GILG) AIRY-SHAW}
- Dioncophyllum {BAILL.}
- Habropetalum {AIRY SHAW}
- Triphyophyllum {AIRY SHAW}
- Lentibulariaceae {L.RICH.}
- Bill Carroll's media (ICPN v11 n4 12/82 pp. 93-96)
- 1:5 MS
- Genlisea {ST.HIL.}
- Pinguicula {L.}
- Adams et al. 1979. HortScience 14(6):701-702.
- 1/5 MS, 30 g/l sucrose, pH 5,8, Agar
- Utricularia {L.}
- Pringsheim & Pringsheim esp. for aquatics
Amer.J.Bot.49:898-901 (1962)
- Carrols's ONLY for large-leaved. sp: U.alpina,
longifolia, calycifida
*= You may add 37,26mg/l Na2EDTA and 27,8 mg/l FeSO4 x 7H2O.
Andreas Wistuba recommends adding the MS-vitamins to Knudsen C medium.
Note: most media should be prepared with agar at 6g/L, and
sucrose at 20g/L.
IBA is an abbreviation for indolebutyric acid
NAA is an abbreviation for naphthylacetic acid
IAA is an abbreviation for indoleacetic acid
MS is an abbreviation for Murashige and Skoog formula.
These are all growth regulators for controlling rooting, multiplication,
callus formation, etc.
Some of these sorts of chemicals are potent carcinogens and should be
treated with utmost respect. I find that for casual home TC, that most
of these are not really needed. They are used for really speeding up
growth or for getting phenomonal multiplication.
If you wish to try these out, then I recommend really delving into
Lydian Kyte's book before beginning.
General References:
- Achieving the sterile state for home tissue culture, Part I, Brian
Johnson, CPS Journal 14, 18-19.
- Achieving the sterile state for home tissue culture, Part II, Brian
Johnson, CPS Journal 16, 9-10.
- Tissue culture of carnivorous plants at Oxford. Steve Woodward, et
al. CPS Journal 15, 16-19.
- Tissue culture of carnivorous plants. Gareth Davies et al. CPS
Journal 12, 17-20.
- In Vitro propagation of the Butterwort Pinguicula moranensis Richard
Adams et al. HortScience 14(6), 701-702.
- "In Vitro Propagation of D. natalensis". S. Afr. J. Bot.
54(1):94-96 1988. Authors: Crouch, I.J. and Van Staden.
- Tisserat et al. (1992). Microwave sterilization of plant tissue
culture media. HortScience 27, 358-361.
- R. L. M. Pierik: In Vitro Culture Of Higher Plants
KLUWER ACADEMIC PUBLISHERS, P.O. Box 358, Accord Station,
Hingham, MA 02018-0358 (ISBN 90-247-3531-9), paperback
- Hutchinson 1984. Scienta Horticulturae 22:189-194 (Dionaea)
- Beebe 1980. Bot. Gaz.141(4):396-400 (Dionaea)
- Parliman et al. 1982. J.Amer.Soc.Hort.Sci. 107(2):305-310 (Dionaea)
- Parliman et al. 1982. J.Amer.Soc.Hort.Sci. 107(2):310-316 (Dionaea)
- Janssens 1986. Med.Fac.Landbouww.Rijksuniv.Gent. 51(1):61-66 (Drosera)
- Bunn 1985. Australian Horticulture. 83(5):103 (Byblis)
- Rathore et al. 1991. J.PlantPhysiol. 139:246-248 (Nepenthes)
- Adams et al. 1979. HortScience 14(6):701-702. (Pinguicula)
- R.A. Dixon: Plant Cell Culture - A Practical Approach
IRL Press Inc., P.O. Box Q, McLean, VA 22101-0850
ISBN 0-947946-22-5 paperback
- Methods in Plant Tissue Culture by Paul J. Bottino, 1981, 72 pages.
- Experiments in Plant Tissue Culture by John H Dodds and Lorin W.
Roberts, 1993 (2nd ed.), 232 pages.
- Introduction to In Vitro Propagation by Donald Wetherell, 1982, 87
pages.
- Carolina Biological Supply has 3 books on plant TC.
Their _800_ number is 1-800-334-5551
- "Plants from Test Tubes - Third Edition" by Lydian Kyte and John
Kleyn, (ISBN 0-88192-361-3) published by
Timber Press ,
133 S.W. Second Avenue, Suite 450, Portland Oregon,
97204-3527, U.S.A. (503) 227-2878, (800) 327-5680 (ordering hours M-F
8am-5pm, Sat 8am-noon, Pacific time), fax (503) 227-3070
e-mail orders to: orders@timber-press.com. - Price is US: US$ 29.95,
Canada: C$ 41.95, Europe: UK 22.50, Elsewhere: US$ 29.95.
- Mellinger's Inc., 2310 W. South Range Rd., North Lima, Ohio
44452-9731, (216)549-9861, Order line: 1-800-321-7444. Mellinger's
is a general greenhouse/garden supply firm. They offer the large
pressure canner illustrated here as a mail-order item.
Rick Walker
Agilent Labs, Palo Alto
rick_walker "AT" omnisterra.com
 Totipotency:
certain cells have the capacity, when isolated and properly
grown, to regenerate a whole plant. This is nothing strange or
unusual. The picture shown here shows how the common "spider plant"
is capable of starting new growth at the end of each shoot.
Totipotency:
certain cells have the capacity, when isolated and properly
grown, to regenerate a whole plant. This is nothing strange or
unusual. The picture shown here shows how the common "spider plant"
is capable of starting new growth at the end of each shoot.
 Meristem:
The region in a growing plant where the cells are rapidly dividing.
The picture shows how the meristem can be isolated from a
strawberry shoot to be grown out in sterile tissue culture.
Meristem:
The region in a growing plant where the cells are rapidly dividing.
The picture shows how the meristem can be isolated from a
strawberry shoot to be grown out in sterile tissue culture.
 Commercial TC media
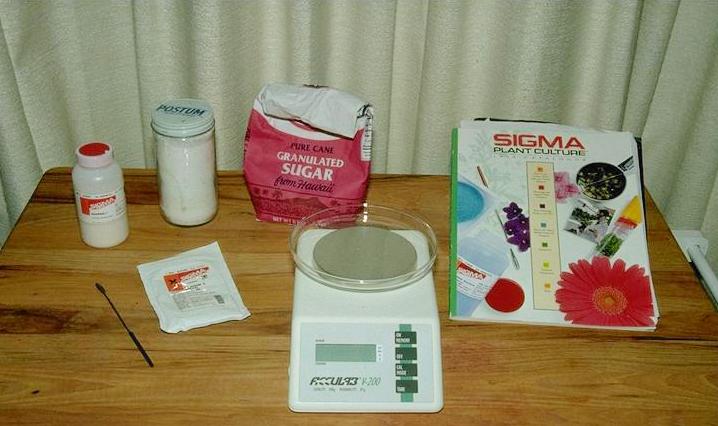 A scale, sugar and agar.
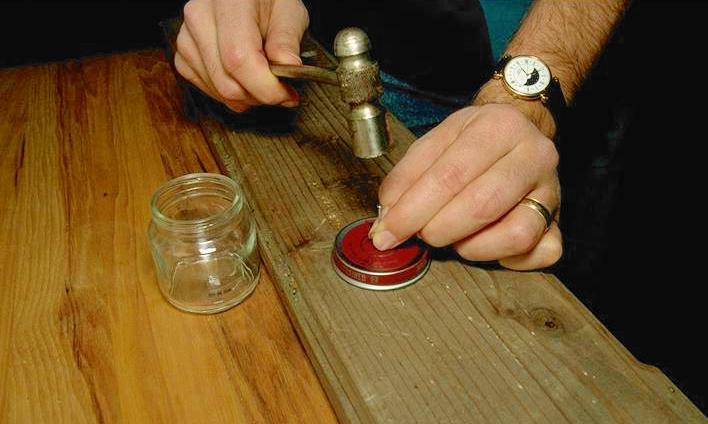 punching an air hole in the lid
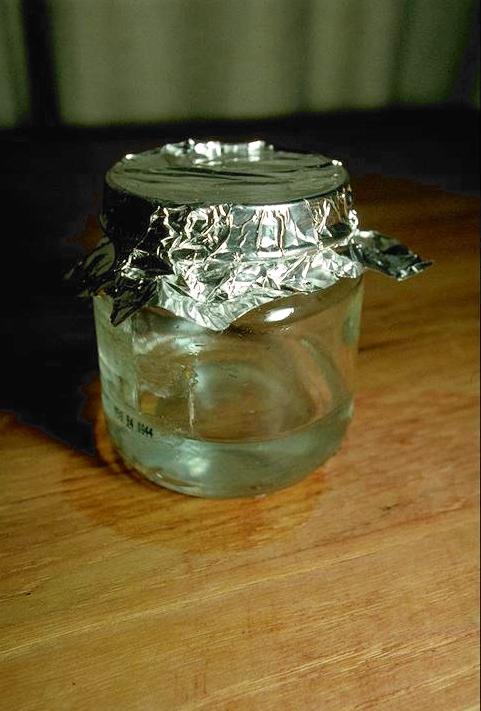 using foil as a contaminant barrier
 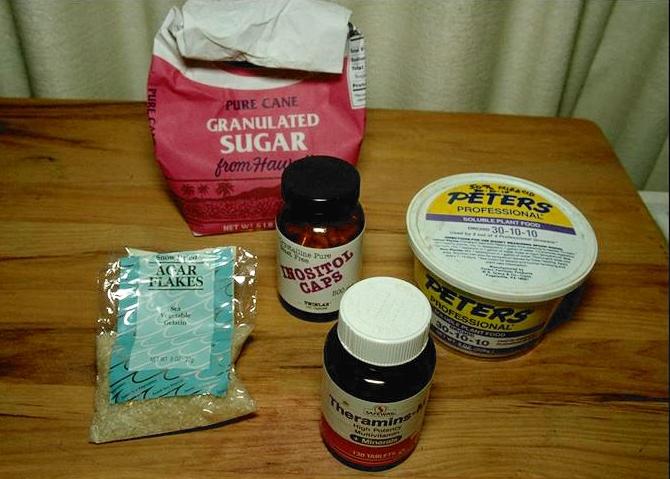 components of a simple homemade media
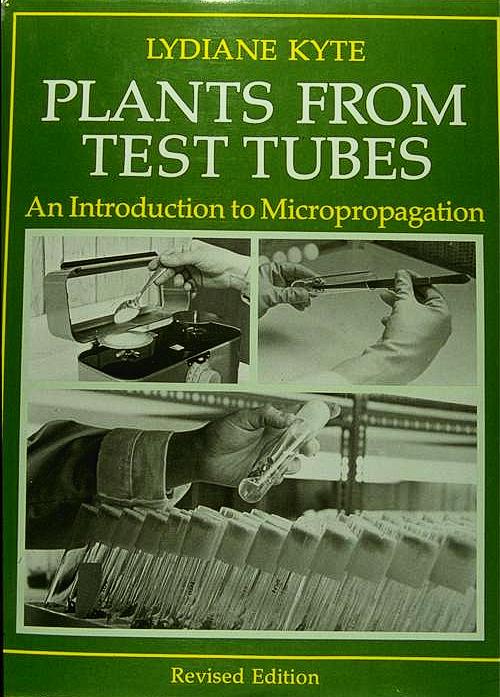 Plants from Test Tubes
 Loading a simple pressure cooker
 Loading a bigger "Home Canner" pressure cooker
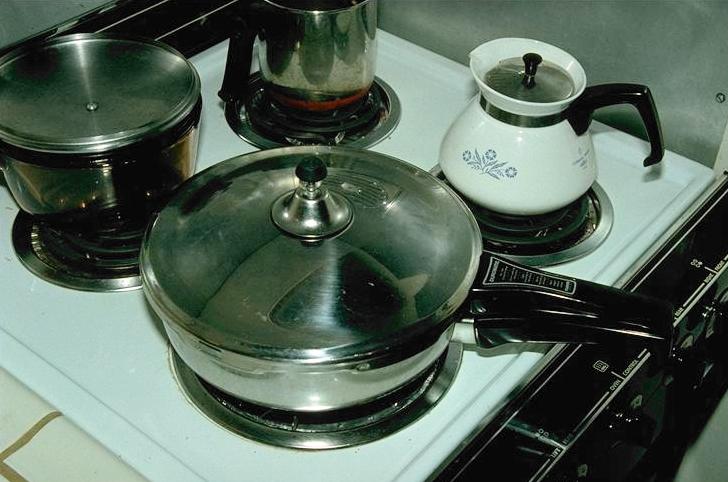 Processing
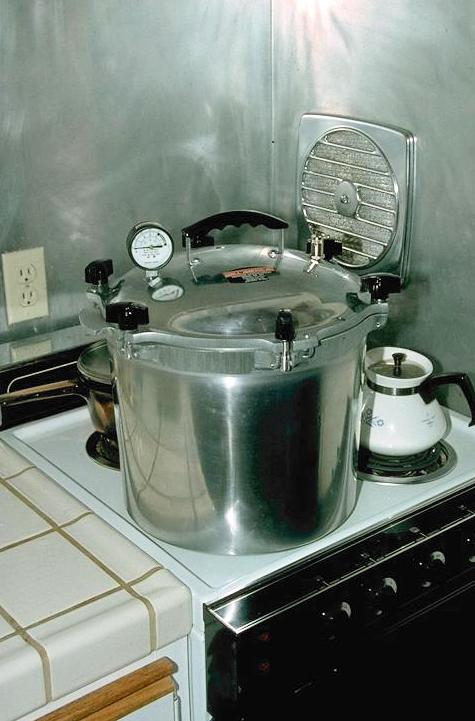 Processing
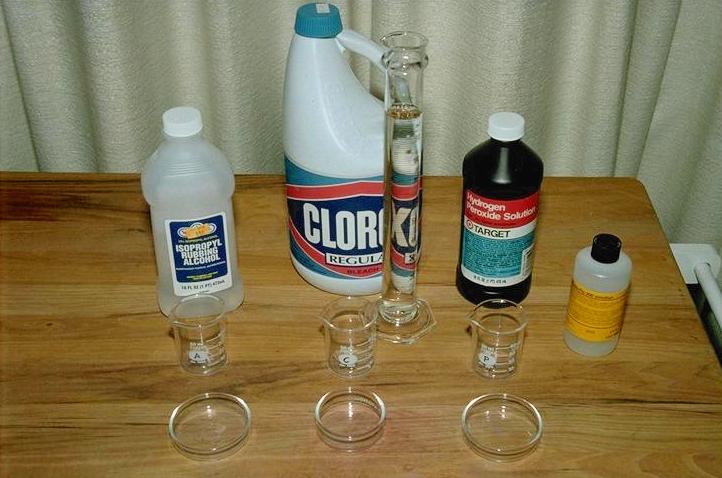 alcohol, bleach & peroxide
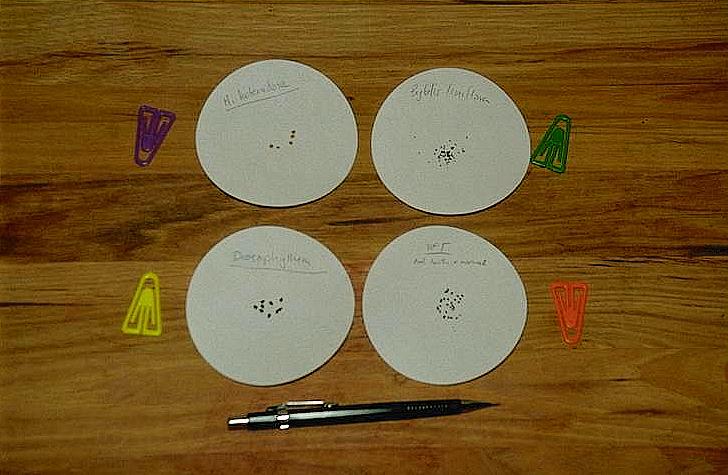 labelled seeds on filter paper
 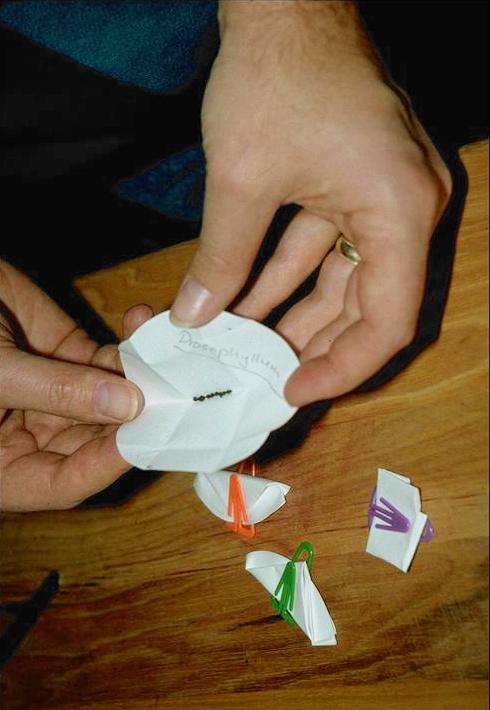 folding paper and securing with plastic clip
 soaking seeds
 A commercial laminar-flow hood
 Simple aquarium transfer box
 cleaning hands prior to beginning work
 tools used for transfer work
 alcohol lamp for sterilizing tools
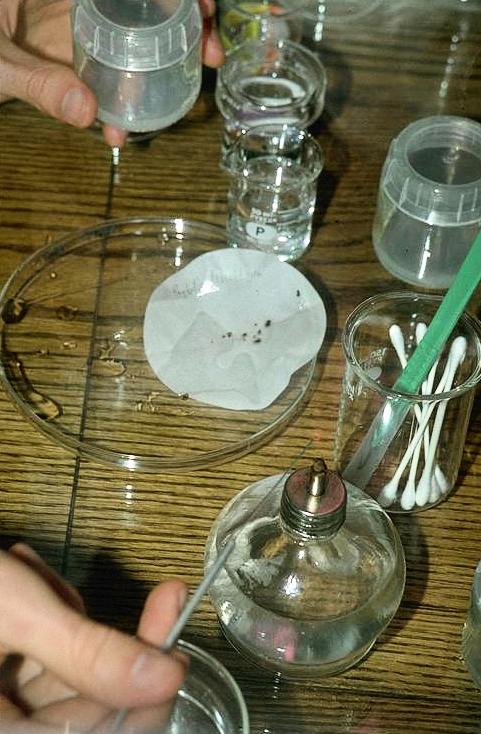 sterilizing innoculating loop in flame
 picking up the seeds
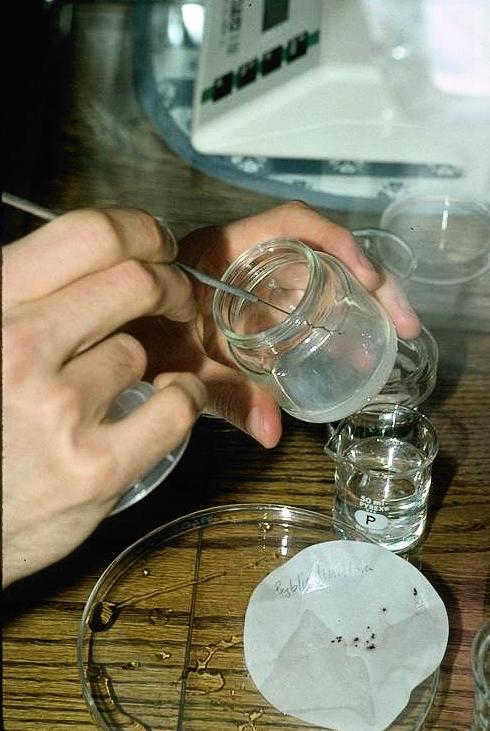 sowing the seeds
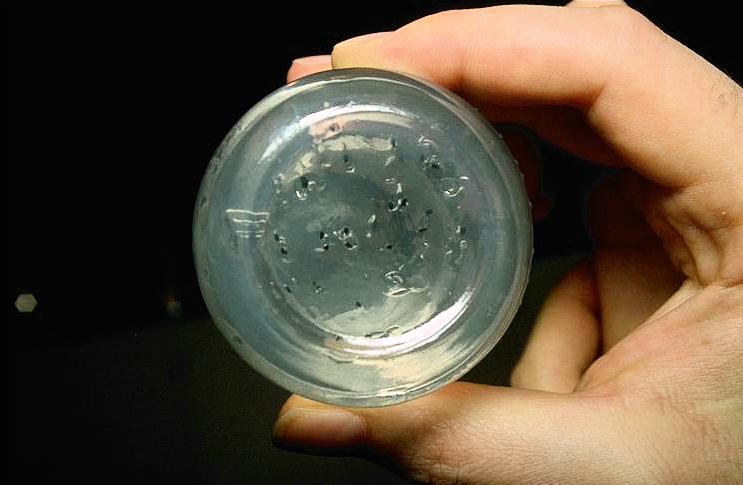 showing seed placement
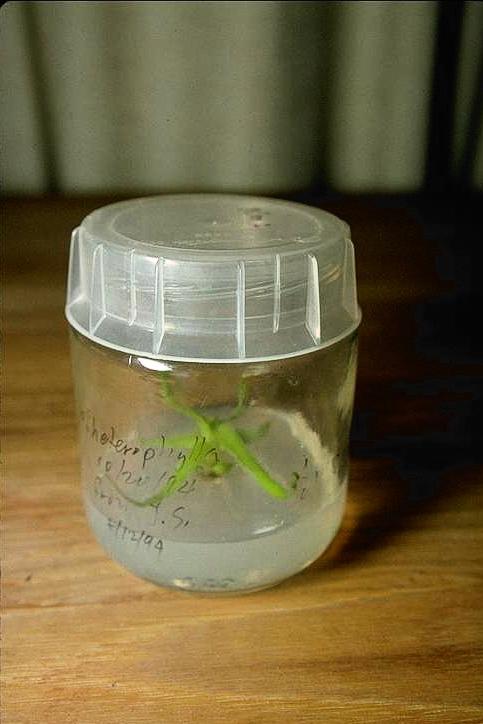 Pinguicula heterophylla in culture
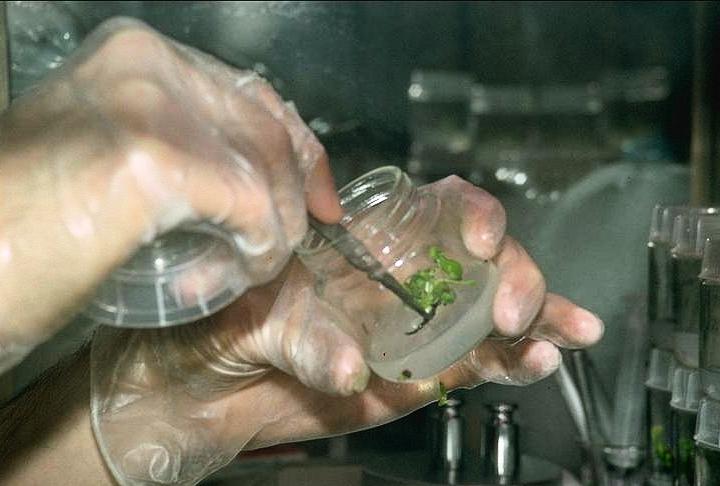 tranferring plantlets
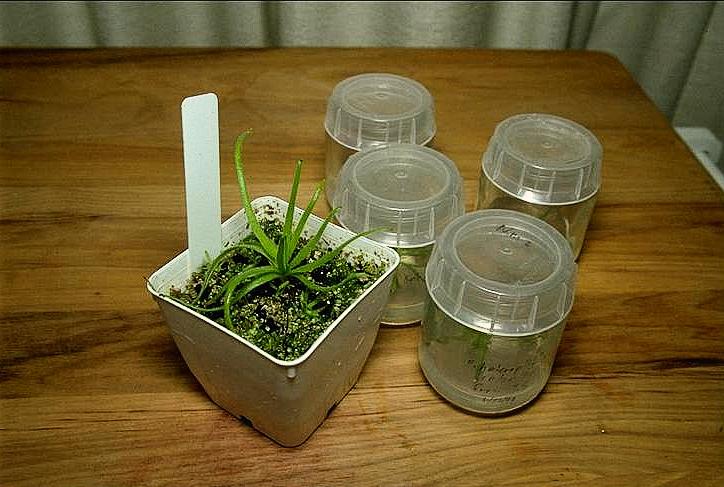 plants in-vitro and also planted out